New Knowledge Base post to be added to archive.

There are three levels of Disk Storage Management at the Mathnet:

P1:
Protected Storage 1 is frequently backed up (every 24-48 hours) to offline disks or redundant storage. End of quarter archives of P1 storage is held for a 12 month period. For most users this quotaed storage area is  known as your Z: drive in Windows or your Home Directory  (~username) in Linux.

P2:
Protected Storage 2 is mirrored storage that is replicated every 24 hours on redundant devices and is not archived to offline media. This unquotad storage area is known as your X: drive in Windows, or your “xdrive” directory in Linux (~username/xdrive).

P3:
Protected Storage 3 provides protection to the extent that no data is deleted during administrative housekeeping. There is no backup of these devices, and the reliability of the storage is subject to normal hardware failure. An example of this type of storage is the local hard disk on a Mathnet computer. This storage area can be thought of as scratch space for non-critical files that can be regenerated.

Although the Mathnet’s P1 capacity has grown dramatically, it will always be administratively expensive. The cost to backup and archive user data and server operating systems continues to grow as new systems come on-line, and user disk quotas are increased. And while disk storage hardware may be relatively inexpensive, the costs associated with maintaining a reliable storage infrastructure is expensive.

It is, therefore, increasingly important that Mathnet users determine what level of protected storage is suitable for their personal data.

Here are some suggestions:

P1: Recent e-mail, current research work, your personal source code, etc.

P2: PDFs, old archived mail stores, information/source code/programs pulled from the Web, copies of audio/graphic files, etc. Essentially any file that you can easily restore from another source, but for convenience wish to have an on-line copy, is suitable for this level of protection.

P3: Computational output from a program you are running, intermediate graphic/audio/multimedia files, large data stores for Web access, etc.

Choosing to use P1 or P2 storage is as simple as selecting the appropriate drive to store your file. We encourage you to use P2 storage whenever this level of protection is sufficient.

If you have any questions regarding this or any storage related issues here at the Mathnet, please contact bugs@math.ucla.edu.

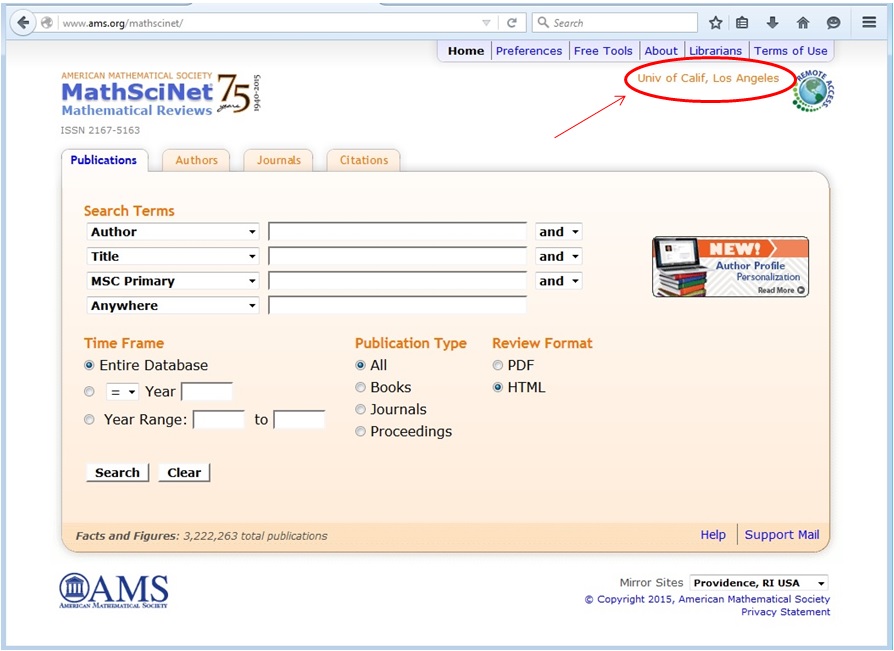
Some websites available to Math Department members are filtered by the network the traffic originates on.  In particular, connections to http://www.ams.org/mathscinet/  must come from a registered UCLA Math IP address to gain full access.  If you are browsing this site from off-campus, and you have a Mathnet Linux account, you can use this proxy setup to make it appear that your traffic comes from one of our IP addresses.  A proxy setup can be configured using OSX, Linux, or Windows using various browsers.  This example shows a connection from a Windows machine using Firefox.  Things you’ll need:  A Linux Mathnet account, PuTTY (ssh client), and Firefox.

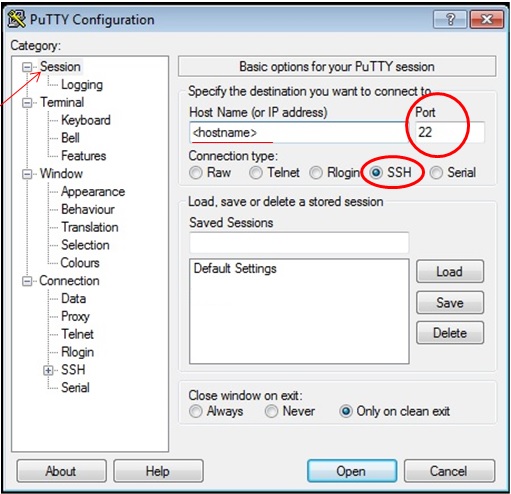
1. Launch PuTTY and enter the hostname ( <homesite>.math.ucla.edu ) and port. Port should be set to 22.

    – The hostname should be your UCLA homesite followed by “.math.ucla.edu”.  Login to a linux machine and type “home” and this will display your homesite.

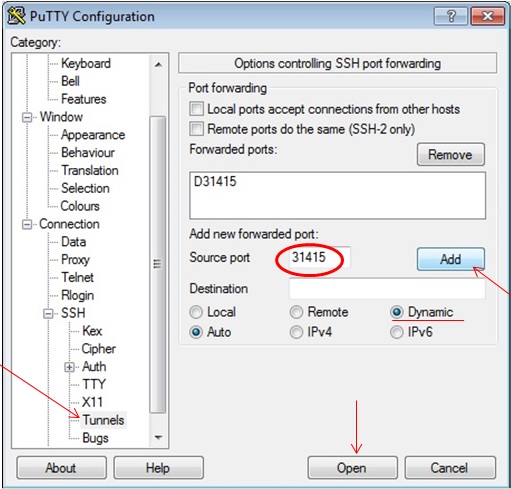
2. On the left side, in the Category window, go to Connection -> SSH -> Tunnels.

3. For ‘Source Port’ enter ‘31415’ (this can be configured to whatever you want, just remember it).

4. Under ‘Destination’ select the ‘Dynamic’ radio button and leave the ‘Auto’ button selected.

5. Press the ‘Add’ button.  You should see ‘D31415’ in the ‘Forwarded ports:’ box.

6. Then select the ‘Open’ button.  This should open and terminal window and you should be prompted to login.

Once the tunnel is established, you now need to set up a SOCKS proxy in your web browser.

1. Launch Firefox.

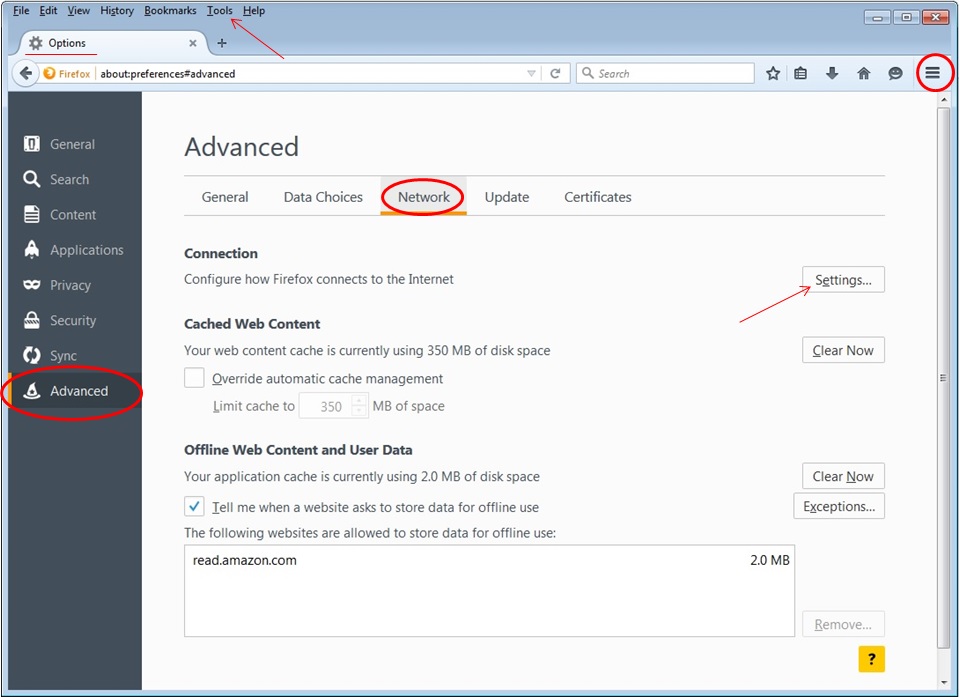
2. Go to Tools -> Options.

3. On the left side of the window, select Advanced.

4. Under Advanced, in the middle of the page, select Network -> Connection -> Settings.

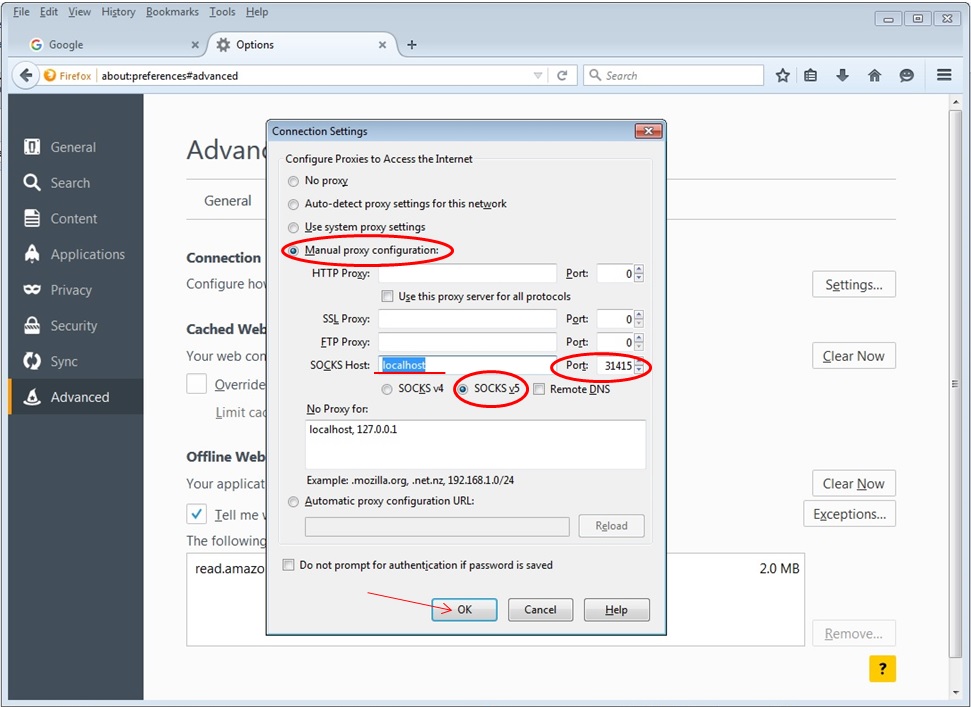
5. Under ‘Configure Proxies to Access the Internet’ select the ‘Manual proxy configuration’ radio button.

6. In the ‘SOCKS Host’ box enter ‘localhost’ and for ‘Port’ enter ‘31415’ (or whatever you set your SSH Tunnel up with).

7. Make sure ‘SOCKS v5’ is selected and select the ‘OK’ button to save.

As long as your PuTTY SSH connection remains connected, your proxy tunnel will be open and you will be able to use the internet through this proxy.

To determine that the proxy is up:

1.  Go to http://www.whatsmyip.org and confirm that your IP address matches the host IP that you are tunneling through.

2.  Also, if you are trying to gain access to MathSciNet, go to http://www.ams.org/mathscinet and look for “Univ of Calif, Los Angeles” in the top right of the page. 

NameVersion
7-Zip 16.04 (x64) 16.04
Adobe Acrobat Reader DC18.011.20040
Adobe Flash Player 2929.0.0.171 
Android Studio1
CutePDF Writer 3.2 3.2
Git version 2.14.12.14.1
IrfanView 4.50 (32-bit)4.5
Java 8 Update 1518.0.1510.12
Java Auto Updater2.8.151.12 
LabStats5.2.50101.167
Maple2018
MATLAB R2018a
Microsoft Office Professional Plus 200712.0.6612.1000 
Microsoft Silverlight5.1.50907.0
Microsoft Visual Studio 2017 1.12.134.36697 
MiKTeX 2.92.9
Mozilla Firefox (x64) 57.0.1
Mozilla Maintenance Service52.5.0 
Mozilla Thunderbird (x86 en-US) 52.5.0 
NetBeans IDE8.2
Notepad++ (32-bit x86) 7.5.2
Print Manager Plus – Client008.137.180
Putty release 7.0 (64bit) 0.70.0.0
Python 2.7.13 (Anaconda2 5.0.0 64-bit)2.7.13
Python Launcher3.6.6032.0 
RStudio1.0.153
Sophos Anti-Virus10.8.1.316 
Sophos System Protection 1.3.1
TeX Live2017
TortoiseHG4.3.1
WinEdt 5.5
WinSCP5.11.2 
Wolfram Extras10.1.0
Wolfram Mathematica (x64) 11.3.0
Xming 6.9.0.31
Xming-fonts7.7.0.10 

MATLAB Toolbox Licenses

Product NameProduct Seats
Computer Vision System Toolbox™10
Control System Toolbox™1
Curve Fitting Toolbox™4
Econometrics Toolbox™4
Financial Toolbox™4
Image Processing Toolbox™35
Instrument Control Toolbox™10
MATLAB®42
Neural Network Toolbox™4
Optimization Toolbox™10
Parallel Computing Toolbox™10
Signal Processing Toolbox™10
Simulink®2
Statistics and Machine Learning Toolbox™22
System Identification Toolbox™1
Wavelet Toolbox™4

Available WiFi Networks

There are two types of networks available for Mathematics Department.

  1. UCLA-MATHNET
  2. ​Eduroam (Education Roaming)

What is UCLA-MATHNET?

 UCLA-MATHNET is a wireless network provided and managed by the Mathematics Department. It is available for current graduate students, faculty and staff members of Mathematics department. If you have any trouble connecting to this network, please visit the Bugs Office in sixth floor of MS Building.

Connecting to UCLA-MATHNET

APPLE Devices

ANDROID Devices

  1.  If you are currently a graduate student, faculty or staff member of Mathematics, you are eligible to use this WiFi network.
  2. To connect, you will need to select the SSID named UCLA-MATHNET on your device.
  3. Then, you will be prompted to enter a password.
  4. The ASCII Key will be provided to you if you walk into the bugs office in sixth floor of MS building. 

What is Eduroam?

Eduroam (Education Roaming) is a secure, world-wide roaming access service for research and education community. UCLA is one of the participating institutions to provide Wi-Fi connectivity to current students, faculty, and staff members. 

Connecting to Eduroam 

You will need your Bruin OnLine ID and password to connect to Eduroam. Select your platform to see how to set up Eduroam.

Android

Blackberry OS

iOS (iPhone, iPad, iPod Touch)

Linux

Mac OS

Windows

UCLA Bruin OnLine Networks 

Wi-Fi networks listed below are managed by the Bruin OnLine office in Kerckhoff Hall. If you have trouble connecting to these networks, please refer to www.bol.ucla.edu. 

  1. UCLA-WIFI
  2. UCLA-WEB

Often times when a sender sends attachments using Microsoft Outlook, the attachments do not show up on Thunderbird but instead show up as a winmail.dat file that is unreadable.

There is an add-on/extension to resolve this issue for Thunderbird, it’s called LookOut.

To install the LookOut extension:

  1. Open Thunderbird
  2. Go to the Tools Menu and select “Add-ons” (If there is no menu bar, you could press Alt on your keyboard to make it appear)
  3. When the Add-ons Manager tab opens, go to the upper right corner search bar and type “lookout”
  4. Click “Install” then Click “Accept and Install…”
  5. Click “Restart now” or close and reopen Thunderbird

After the installation is complete and Thunderbird is restarted LookOut should automatically display attachments properly.